How to Get Started
First you have to go to the auth0.com and just sign up if you don't have an account .After you login you will have access to your dashboard where you can control everything .
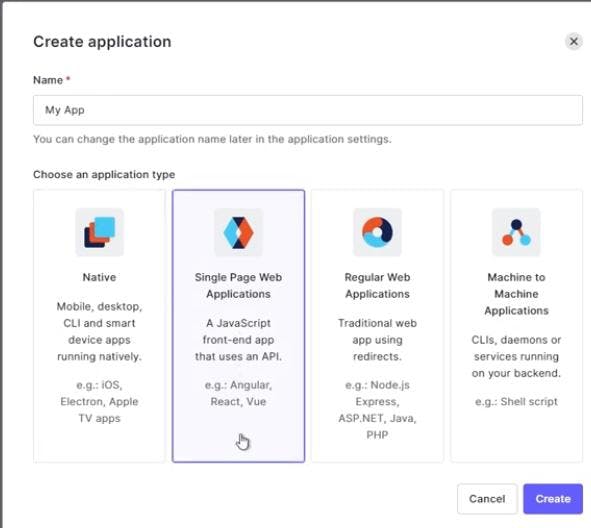
First you have to create an application because obviously you are building an application. Let us just say it's my app then it will show you the type of the application because this makes easier for the auth0 to get integrated so we'll be using next is so that is a single page web application as you can see here like react and stuff so we will use that so single page application.
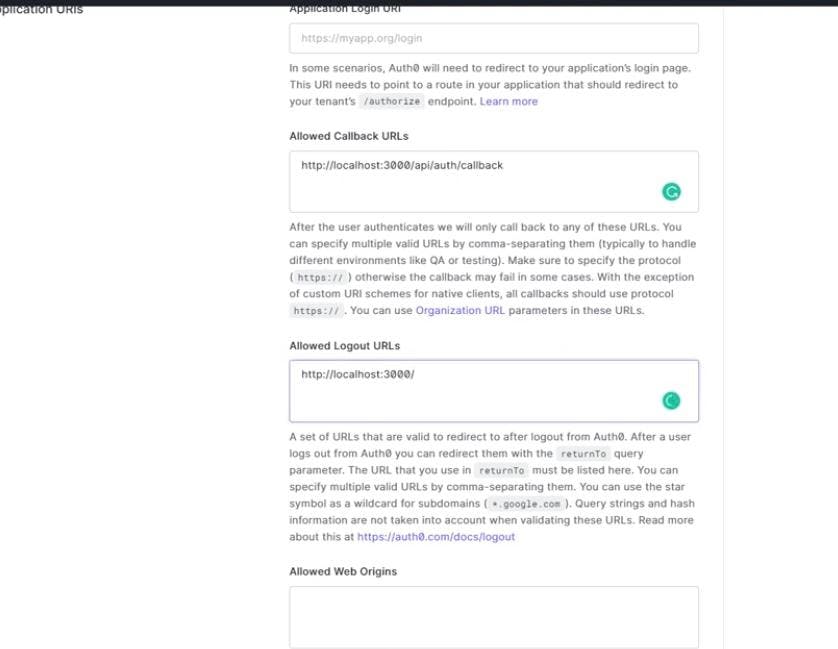
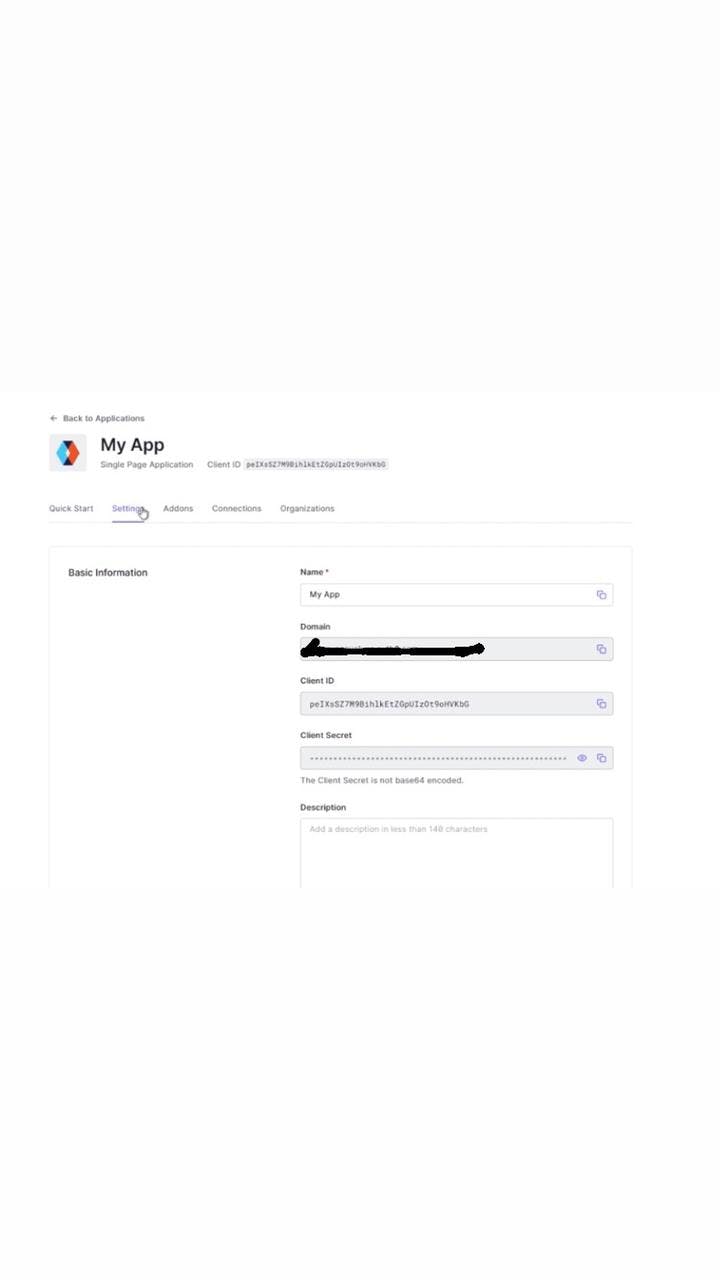
Now you have the app and here we have client id and there are many stuff we will use. Now go to settings if you have any logo for your app you can paste it here the link so that when it shows the authentication form instead of this logo you will have your apps logo. Then just paste this thing
Allowed Callback URLs: localhost:3000/api/auth/callback
Allowed Logout URLs: localhost:3000
Just save it .
Go to the editor where you code .I am using vs code & here let's just get our next js app okay so to create a nexus app you have to just write npx create next app and the name of your app let's say my-app. Now that you can see the success can be set up .
So we can go into our app that is cd my app and there you go and if you just now to npm run dev your app should work but will not do that because you have to install another thing too so that is the next chase or zero sdk which is the chase or zero sdk which is the developer kit which actually which actually makes this integration of authentication with next chase of integration of authentication,so that just gives you out of the box the hooks or the react hooks that you can use to just get your user and whatnot that just helps you to implement the authentication really really fast and we will see that so let's just install that and to do that you have to just do npm install. While that install I'll just go to my app and just make a environment file where you know just store your keys and stuff right so and dot local.
Now here you have to add some credentials that will tell the on that will tell all zero that yes you are the user that is using the service and you are the authorized user to make these requests right .
AUTH0_SECRET="[A 32 characters secret used to encrypt cookies]"
AUTH0_BASE_URL= localhost:3000
AUTH0_ISSUER_BASE_URL="https://"
AUTH0_CLIENT_ID=
AUTH0_CLIENT_SECRET= "[can be found in the dashboard under settings]"
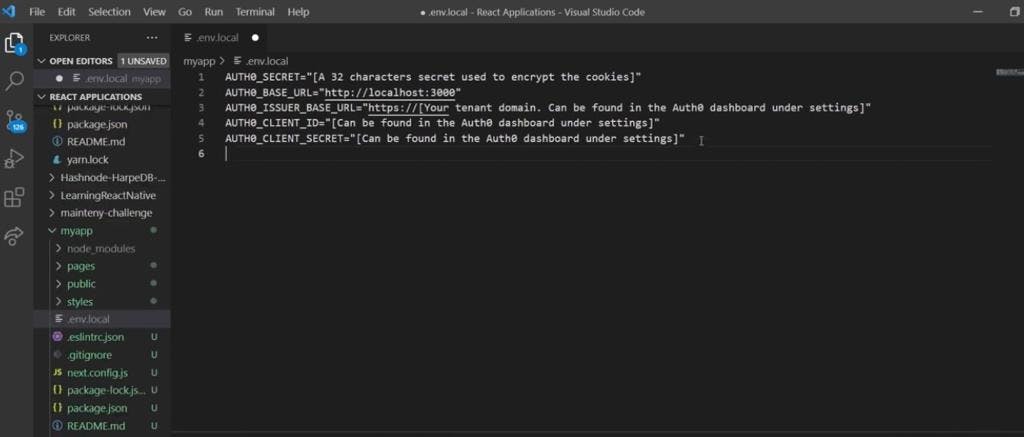
This is the template you have to fill according to what you have in your settings so you know you just have to go to this application and under the settings you'll find these three things just and that is all you need to fill in here so let's just fill that so the issuer base url is this thing the domain copy that and just paste it in here just let the http you don't got the https right so the client id and the client secret you can copy it from here .
So the auth base URL or zero base URL will be remaining this one so let it be there now after you deploy the whatever the domain you have for example i will have for example I if I have learning.tech so instead of uh localhost you have to do your learning.tech right so that's what you have to just do here but as you're developing now just let the base URL be localhost 3000 .
Now to get the auth0 sec secret what you have to do is that just go to your command prompt or let me just try here because this is also command prompt so just just paste this thing and run it so you'll get this string copy that right so that you don't have to search and stuff so just copy this thing this will be generated and just paste it .
Command to get AUTH0_SECRET : node -e "console.log(crypto.randomBytes(32).toString('hex'))"
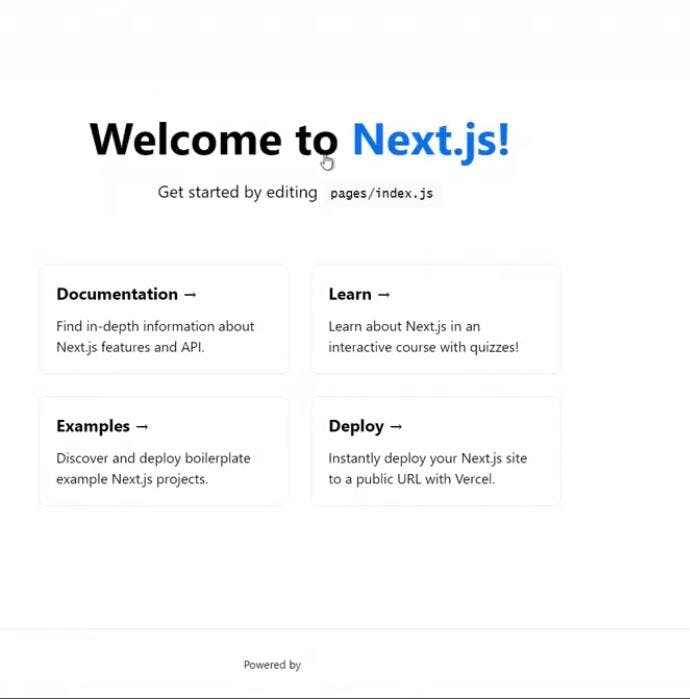
So now that so this is all you need to do in the dot and dot your environment file so just save that now as we have installed so as you can see now the auth the sdk is installed so now we have everything done let's just run our app npm run dev. So this is what you have to actually do to run your next chase app just press enter now if you go to your browser and just do localhost 3000 you'll see that you'll have the default nexus or thing that it provides so you'll see that you'll get this default nexus template that it provides okay so now there's just a little step remaining now go to your pages and then go to the app dot js now you have to import here user provider from the sdk that we installed right so what this user provider is a component which wraps around your whole app it has a react context or you know state management kind of thing built inside which actually wraps around your app and you know provides the authentication service to all the app.
For example ,if you don't want the authentication to be in some page of your app you can just not wrap it inside the user provider but as we want our whole app to be you know want authentication we will be wrapping the my app which is basically from where everything will be every page is getting rendered or with our user provider component so to do that you just you know just wrap this component with user provider and that's that's basically it now you have access to whatever this component provides inside your app right okay so now that this is done you just have a little simple thing left to do so just go into your pages then go into api make a new folder call it auth and inside that out for auth folder make another file and name it like this this is a dynamic route so this is the name like this just square bracket triple dots then auth0 dot js
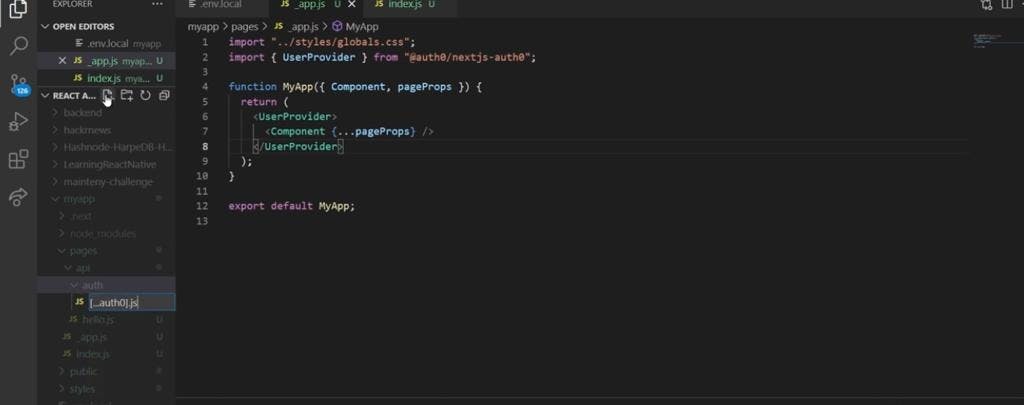
Now inside it just import something called handle auth and then export that thing okay export this export default handle auth beautiful right so that's done now. At this point you have set up the authentication technically now you just have to use it index.js so this is the file which is actually rendering this page so this is the files so to just make it look really simple i'll just remove these things just keep this div and that's done now .If I just save it and it should all go away great and now you have to just import this user hook which actually the sdk provides us and this is all you need to do anything you want with the user to authenticate so you will just import this and this is a hook this provides us many things and you'll see what it does so now from this use user you want basically the user.
We want to know the state of the user is the user there or not is the user loading or is there some error that's all we need to know basically right so we will just do that assign it to use you'll get that from this thing so now let's just use it so if you have a user we want to show what the log out button because it he does not need to log in anymore so we'll show the log out button I'm making it link you can make it a button right so else if he is not there if the user this user is false what do we need to show we need to show a log in button right so instead of logout i'll just say login right now.
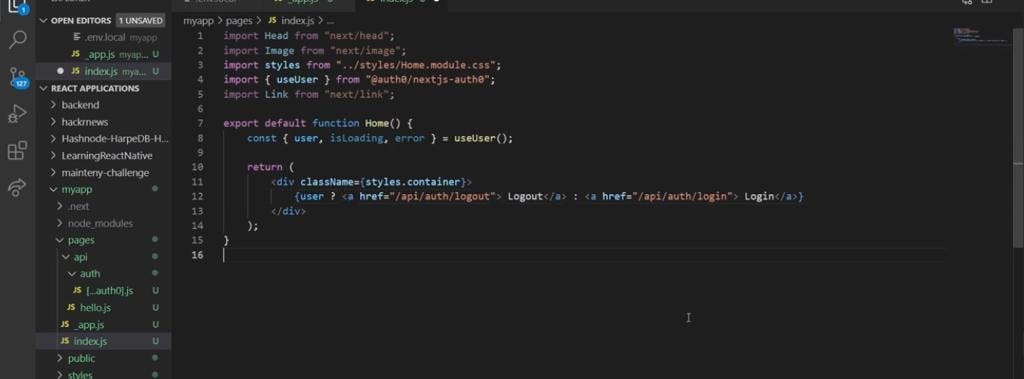
If I just save it and we go here you'll see that this obviously does not work because you have not given it where to go right so whenever you are using log in what you have to just do is that your link will be api slash auth like the folder structure we made right so this goes into api though this folder this then goes into auth this folder and then this is a dynamic route right so this will take whatever it you give it so here i will give it log in and i'll just copy that and exactly like that while i'm logging out i'll give instead of login this is the dynamic route right so i'll give it log out right so now if I just save it and go here you'll see that here
we have a link now if i just click it I should be able to log in boom right so that's how easy it is like you just implemented authentication in your app let's just show you that this thing actually works so before i show you that let's just implement something so if you have the user for example now for example you have the user you also want his name or email or whatever, so let's just get get his name so to get the users things you need to use this user right so as we are using here is the user there or not so when we have a user we will have his name too so if I just give here if i just say user dot it will show me some things that the user could have so let's just say name and it is showing me this because you don't have a single wrapping element because you're returning this so now it will also show if you have a user it'll show also his name so if i just save it let's just continue with google so if you're wondering how this happened you can go to your application you can tap connections i guess and here you will see that google oauth is actually default connection default social work so you don't have to add it so now if i just go through this i'll be now automatically redirected to my app and it will just ask do i need to authorize the app yes i will authorize so here you can see actually i have added a logo there we go we have our user here right we also have log out and you can just style it and there you have it your authentication that fast now imagine I just want to log out of my apps and now boom we have log in right so basically authentication is set up you can basically now focus on your project now if you're wondering well how do i use is loading so for example when you use it is that for example you can wrap this thing and say that um you can do.
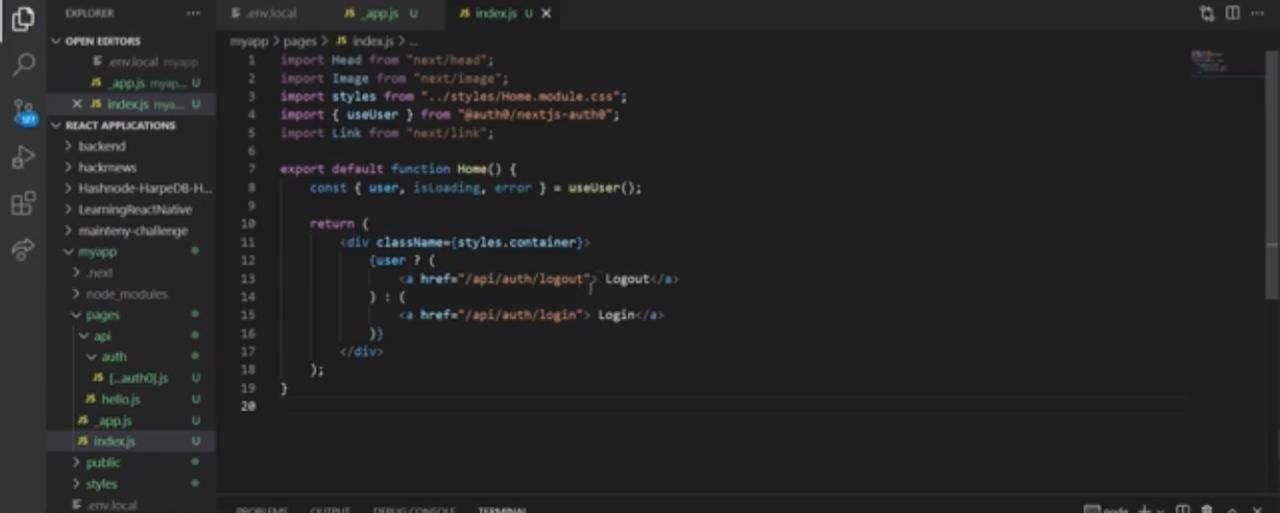
Now i will say that i will just wrap it in another curly bracket i'm just making it messy to show how this loading thing works actually so i'll just again another put another condition is if it's loading if it's loading then just show loading or show this division right so now what will happen just let me save it boom.so now what will happen is that if it's loading so i'm getting this i'm not implementing any state or whatsoever so if it's loading if the authentication is in process i will show loading if it's not else i will show this thing so if i just save it go here and i'll just tap log in.
tap this now now watch this now see loading so just show loading so now what you can actually optimize here is that when you make your app instead of showing loading you will show a spinner so that will make your app look great right so if i just tap log out and boom so yeah i just used it recently loved it i just wanted to share it with you it's totally free up to some users so on your site projects it's totally valid to use because it's clean and clean and you saw how fast you can implement it.
